How to Find Answers to Your Special Ed. Law Questions


Special eduction law can be a bit gray at times.  Although it should be clear cut, it can be difficult to get explicit answers to some of the basic questions that pop up in the day-to-day life of a special education teacher.  

Here is a scenario that you may have run into before.  You need to set up an IEP meeting, but have been unable to confirm a meeting time with the family.  How many attempts do you need to make to set up an IEP meeting with a family? What do you do if they don't respond? Can it all be done through email and phone calls or does one of the attempts need to be a letter? Does one attempt need to be a certified letter? 

While there are laws related to these questions (which you can find HERE), you may find the answer given still leaves you a bit confused.  

When it comes to these questions, and many more, the law does not give specifics.  The specifics tend to come from each state's interpretation of the law and from court case rulings.  

So how is a special education teacher supposed to make sense of the scattered out information and try to teach at the same time?  

Well... it's really hard.  


Some districts have incredible administrators who have a deep understanding of the law, current court cases, and best practice.  Many of these districts also reach out to lawyers for guidance.  They do the leg work so you can focus on providing your students with what they need to be successful.  With that being said, it is still in everyone's best interest to know how to seek out the answers to your own questions.

If you do not have this level of support in your district, you will have to take the extra steps to become informed of your role and responsibilities as a special education teacher.

I cannot answer all of your questions here.  However, I can provide you with some links and resources that will empower you to become more informed and confident in your understanding of special education law.  I am going to share a ton of information.  I recommend bookmarking this page so that you can refer back to it as questions arise throughout the school year.


But first, let's start with the basics. There are three main federal laws that address disabilities.  I recommend you click on the links and skim through each of the laws.

The Individuals with Disabilities Education Act (IDEA) The primary purpose of IDEA is "to ensure that all children with disabilities have available to them a free appropriate public education that emphasizes special education and related services designed to meet their unique needs and prepare them for further education, employment, and independent living." IDEA (2004) This is a major law in the world of special education and there is a lot jam packed into this act.  You can use the search feature on this page to find information related to a specific topic. 

Americans with Disabilities Act (ADA) - This is a civil rights law prohibiting discrimination based on disability.  This law is less applicable to public education, but is still valuable to review. 

Section 504 Rehabilitation Act - Section 504 extended civil rights to people with disabilities in education and other settings.  The act outlines the need for a free and appropriate public education (FAPE) which may include reasonable accommodations.  Unlike IDEA, students do not need to qualify for an IEP to fall under the umbrella of 504 services.  Please note - this is why it is extremely important that the accommodations listed in the IEP or 504 plan are being followed.  If they are not, it becomes a civil rights issue, not just a special education issue. Click on Subpart D for information related directly to preschool, elementary, and secondary education. 


If reading through those three acts seems daunting, don't worry.  I am going to share with you some great resources for synthesizing the plethora of information found above. 

WrightsLaw - I cannot recommend this site enough.  It is run by Pete Wright, an attorney who represents children with special needs, and Pam Wright, a psychotherapist who has worked with children and families since the 70s.  They summarize court cases in a way that is easy to understand and provide concrete takeaways from the rulings.  They have also written numerous books related to special education law and provide training around law and advocacy throughout the country.  Make sure you sign up for their newsletter to stay on top of current court cases.  The website has quite a bit of information and can be a little difficult to navigate.  However, you can click HERE to watch a quick video about how to sift through all of the information.  


Center for Parent Information and Resources - This website was produced under the U.S. Department of Education, Office of Special Education Programs.  While it is geared primarily toward parents, it serves as a great resource for anyone working with students with special needs. Their resource library provides links to documents related to disability services and special education. This site is easy to navigate and the information is accurate and concise.  


National Education Association (IDEA & Special Education) - This site offers "IDEA Briefs" to explain developments about and aspects of the Individuals with Disabilities Education Act (IDEA).  They are presented in a question and answer format, and are quick and easy to read. The site also offers a nice summary of the 2004 reauthorization of IDEA found HERE


Department of Education - The specifics surrounding special education law can vary between states.  Search your state's department of education website for state specific laws, codes, and policies.  You can search for your state HERE and get a list of helpful links. 


State Specific Education Association Many states have their own rules and regulations that expand upon those found in IDEA.  Your local union (if applicable) may have resources to help you learn more about special education law in your state.  If you are unable to find answers on the website, don't hesitate to reach out to your local union reps to see if there are any resources or training opportunities that may be available for special education teachers. 

Understanding the law is a huge undertaking and I hope that this post has given you some guidence and resources to make it a bit easier.  Do you have any other go-to resources for special education law?  Please share in the comments below!


Sensory Bins on a Budget - Dollar Store Edition!


Utilizing sensory bins can get expensive... but it doesn't have to!  Here are some of my favorite dollar store finds for setting up your sensory bins on a budget.

1. Clear Plastic Containers - You can find these for around a dollar at most big retailers.  I like to go for clear bins with a lid so I can easily see what is inside. These can be used as a single student sensory bin or to store some of your sensory bin filler when not in use.


2. Rice and Beans - The food isle is full of sensory bin fillers.  I often see white rice, black beans, and kidney beans. Lentils and split peas are two of my favorite fillers and every once in awhile I will see them on the shelves of the dollar store.

3. Pasta - Look for boxes or bags of elbow noodles or penne pasta.  They make a great filler for your sensory bin!


4. Colored Sand - Did you know that the dollar store carries colored sand? They do! It is a quick and inexpensive filler for both salt trays and sensory bins.  I like to use the red sand in my Valentine's Day bin.  I mixed it with regular sand and noticed that the texture is a little lighter.  The two colors separate a bit as the kids play... which makes it even more fun!

5. Aquarium rocks and gravel - These give your sensory in a uniquely rough feel.  They are great for construction or dinosaur themed bins.


6. Shredded paper is one of my favorite fillers to pick up at the dollar store.  It comes in a ton of different colors and is a nice contrast to my typical fillers.  It can be found by the gift bags.


7. Muffin tins, plates and trays - I like to give these plates to my students and let them sort the objects however they want. Sometimes they will sort based on shape and sometimes based on color. 


8. Magnetic Sheet Pans - Every few months I find magnetic refrigerator scenes in the seasonal section of the dollar store.  I always pick up a few to create a fun magnetic sensory bin.  I give each student a sheet pan (round pizza pans work well too!) and they have a blast creating a scene out of the magnets.     Magnetic letters or numbers can also be used to create a more academic bin. 

9. Funnels, Spoons and Measuring Cups - These are super versatile and can be tossed into nearly every sensory bin.  The funnels, spoons, and measuring cups give the kids a chance to measure, pour, and stir the filler. 


10. Party Favors - I always check the party favors for fun toys that I can toss in my bins.  They typically come in multiple colors so I can split the pack up and put each color in a different bin.  Some of my favorites are the mini-maracas, rings, and mini slinkies.

11. Beaded Necklaces - I stock up on beaded necklaces for every holiday.  My kids love to pull them out of the bins and put them on.  They can be found in the seasonal section around most major holidays, as well as in the party isle.

12. Seasonal Trinkets - I pass through the seasonal isle every time I am at the dollar store and always find something that would be perfect for a sensory bin. 


13. Fake Flowers - The dollar store typically has fake flowers for every season.  They make a great addition to most bins.

14. Pots and Gardening Gloves - Adding on to the fake flowers... try throwing in some plastic pots and gloves to make a gardening bin!  These are typically only available during the spring and summer so make sure you pick them up while you can.

15. Water Beads - The dollar store carries containers of water beads by the candles, frames, and crafts. They come full of water and ready to use!

16. Plastic Jewels - My students love to dig through the bins to find these jewels.  They can sort them by color or count them out on a 10 frame.


17. Shells - Who knew you could buy seashells at the dollar store!?! They can be found by the candles, frames, and crafts.  They are perfect for a beach bin.

18. Polished rocks - I love to add polished rocks to any "outdoorsy" bin. I add them to my construction, farm, bug hunt, dinosaur, and gardening bins. 

19. Glass Beads - These can be found by the candles, frames, and crafts.  The clear beads look beautiful in winter and beach bins and the blue and green are perfect for an under the sea theme. 


20. Pom-Poms - These add a pop of color to your bins.  I like to separate the colors and add them to each thematic bin.  For example, I put the orange into my fall bin, blue into winter, and red into Valentine's Day.  If you buy a few packs, these pom-poms also make for a unique sensory bin all on their own!

21. Buttons & Beads - I love to use buttons and beads in my sensory bins to add texture and color.  Just like the pom-poms, I often separate the colors and add them to each thematic bin.

22. Pipe-cleaners - It is amazing how creative kids can be with pipe-cleaners! They can twist them together to make rings and bracelets or add beads to create a pattern. Toss a few into your sensory bins to get their creative minds working.

23. Jewels & Gems - Jewels and plastic gems can be found in the craft section.  They come in a variety of colors and shapes and are a fun surprise when tossed into a sensory bin.


24. Large Tweezers - I love these tweezers!  They are huge and perfect for little hands to work on fine motor as they pull items out of the sensory bins.

25. Magnifying glass - These magnifying glasses are a fun addition to nearly any sensory bin.  Kids can get an up close look at all of the treasures and goodies hidden in the filler. 

26. Flash Cards - I am often surprised at how many of my students love to look at flash cards when I put them into a sensory bin.  It is a great way to build vocabulary and encourage communication.  I like to look for cards that fit with the theme of the bin. 

27. Mini Erasers - Most people seem to get their mini erasers at Target, but did you know that many dollar stores carry them as well? They can often be found in the office section. 


28. Small Toys - You know those tiny toys that kids play with once and then toss aside?  They are perfect for sensory bins! The dollar store often has packs of small toys that can encourage imaginative play.  Some of the packs that I have found contain farm animals, ocean animals, construction vehicles, and doll house furniture. 

29. Puzzles - The dollar store often carries small puzzles.  I love to add these into my sensory bins.  The kids dig through the bins to find the pieces to complete the puzzle.  This adds an extra level of complexity in addition to the sensory input.


30. Bug hunt sets - You can typically find a bag of plastic bugs in the toy section.  These are great for a bug exploration or gardening bin.  This set also contains a net and bug catcher!

31. Rubber ducks - I love to toss these into a bin of waterbeads to create a duck pond!

32. Small animals - The dollar store has a huge selection of small plastic animals.  Over the years I have seen dinosaurs, fish, snakes, farm animals, and zoo animals.  They are a great option to create a variety of themed sensory bins.


Have you found any other treasures at the dollar store?  Please share!  And if you are looking for more tips and tricks for sensory bin fun, be sure to check out my Sensory Bin Blog Post Round Up.


Top Sensory Bin Fillers for the Classroom


When it comes to sensory bin filler materials, not all are created equal!  This is especially true in the classroom.  Oobleck and pudding mud may offer amazing sensory input, but they can be a challenge to manage in a classroom sensory bin.  Don't get me wrong... I am a huge fan of messy sensory play but I keep those activities separate from my sensory bins.

 I find that my favorite classroom sensory bin fillers have 2 things in common:

1. They are dry - Dry materials last longer than wet materials.  The only exceptions I make in my classroom are water beads and the occasional water table.  Other than that, you will probably only get 1 day of use out of most other wet materials.

2. They are reasonably priced - Let's be real.  I would love to fill my sensory bins with fresh water pearls and Mulberry silk scraps but my budget won't allow it.  I like use items that will fill my bins for just a few dollars.

So do you want to know what filler materials are at the top of my list?  Well here ya go!

1. Rice
2. Colored Rice (use food coloring or liquid watercolor
3. Black Beans
4. Kidney Beans
5. Colored Pasta
6. Macaroni Noodles
7. Ditalini Pasta
8. Couscous
9. Dried Chick Peas
10. Cut Up Straws
11. Colored Sand
12. Shredded Paper
13. Colored Salt
14. Aquarium Rocks 
15. Water Beads (not dry... I know!) 
16. Easter Grass
17. Pom-Poms
18Kinetic Sand
19. Popcorn Kernels 
20. Bird Seed
21. Cotton Balls
22. Oats
23. Lentils
24. Split Peas
25. Poly-Pellets
26. Sensory Pellets (a little pricy but fun!)
27. Pony Beads
28. Fuse Beads

Are there any other fillers that you love to use that didn't make my list?  Please share!  And if you want to learn more tips, tricks and ideas for implementing sensory bins into your classroom make sure you check out my sensory bin blog post round up!
(this post contains Amazon Affiliate links)

3 Tips for Storing Monthly Sensory Bin Materials


Figuring out an efficient system for organizing sensory bin materials can be overwhelming.  But don't worry... I've got ya covered! Below you will find 3 tips for storing the activity cards and pieces from the Monthly Sensory Bin Bundle.  If you want to learn more about how I store all of the filler and goodies, check out this post.

I like to use the square plastic adhesive labels from the Target dollar spot to store the prices for each activity card.  I found a similar set on Amazon.  I attach them to the back of each card to store the pieces.  TIP! - If you want the pages to stack nicely when you store the materials, alternate where you put the adhesive label.  I like to alternate between all 4 corners. 


I store each month in these zipper pouches.  I found these at the dollar store, but you can also pick them up at most office supply stores or Amazon.  I recently got another pack from Amazon and they are SO MUCH sturdier than my dollar store set!  They also ended up being less expensive, which is always a win in my book.  They are able to fit 15-20 activity cards and pieces.


I have seen these clear pouches at the Target dollar spot, the dollar store, and Amazon.  This is a great option if you don't want to laminate all of the boards.  You can keep the entire month's worth of board in this pocket and quickly swap out the activity cards as you need them.  The activity pieces can be stored separately in a ziplock bag or envelope.


What about you?  Do you have any tips for storing sensory bin materials?  If so, share them in the comments! And if you want more tips, tricks, and ideas for sensory bins check out my Sensory Bin Round-Up blog post for all things sensory!
*This post contains Amazon affiliate links. 

Sensory Bin Round-Up

I don't know about you, but I love sensory bins!  Over the next few weeks I will be sharing some tips, tricks, and ideas for using sensory bins in the classroom.  I will link all of the posts here, so make sure to bookmark this page to keep updated on all things sensory!


How to Create A Focus Wall in a Special Education Classroom

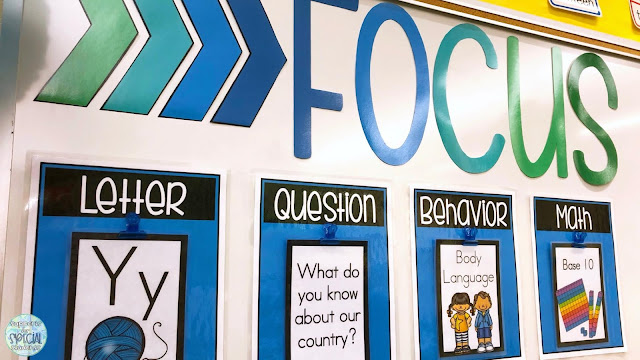
Faded photo with large letters reading "Focus" with 4 posters below listing objectives for: letter, essential question, behavior, and math

One of the biggest benefits to teaching in a special education classroom is having the flexibility  to meet the students where they are at. Everything is specially designed to build upon their skills and make the content accessible.  With that being said, this focus on individualization can make it a challenge to create common learning targets for all students.

"Focus" written in large letters on a white board, 4 posters underneath  listing objectives for: letter, essential question, behavior, and math

I like to keep my overall classroom learning targets general, and my small group learning targets more specific.  For example, as a class we may be focusing on fractions and my 3 small groups could have more targeted objectives ranging from identifying whole objects to adding fractions with like denominators.

Large letters reading "learn." Below are 2 smaller subject cards and objectives, reading 1  I can match letters to sounds, reading 2 I can read CVC words.

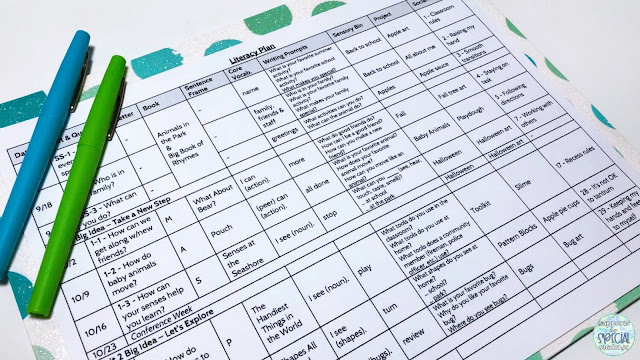
Since my main classroom learning targets are general, I only have to swap them out once a week or once a month.  I find this far more manageable than trying to update our big focus wall daily.  The other time saving step that I take is pre-planning all of my weekly objectives.  I create a scope and sequence each year with all of the "big ideas" that I plan to teach.  I use this document to create my focus wall cards.  You can read more about how set up my scope and sequence HERE.

White literacy plan on a blue and green folder. Blue and green flair pens are placed on  the upper left corner of the document.

I like to print off all of my focus wall cards over the summer and organize them in the order that I plan to teach the topics (this is where that scope and sequence comes in handy!).  Since the cards are in order, it takes me less than 30 seconds to swap out the cards each week.  You heard that right... less than 30 seconds a week!

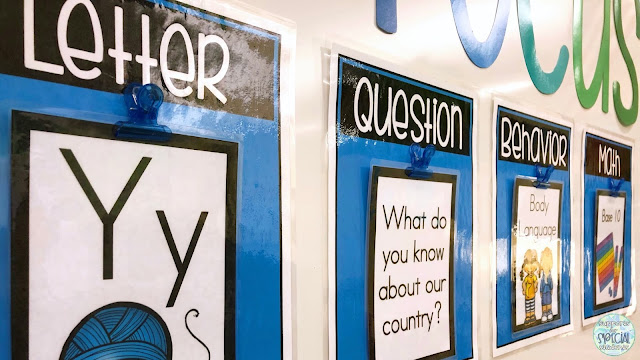
4 posters  listing objectives for: letter, essential question, behavior, and math

For my focus wall I typically include a weekly essential question, letter of the week, math focus, and behavior focus.  The letter and math cards are included in my Focus Wall Bundle, and I use the editable cards from the file to type out my essential question.  These questions align to our district's general education reading curriculum.


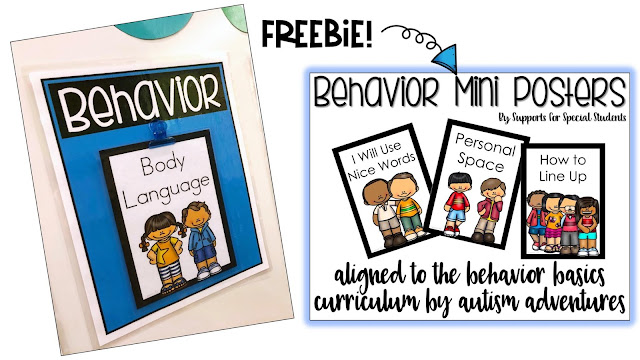
I created the behavior cards to align to Autism Adventures' Behavior Basics program.  The program is amazing and provides multiple levels of social stores and activities for 60 different behaviors and social skills.  It is well worth the investment.  If you are using the program and would like focus wall cards that align to each of the behaviors... you're in luck!  Mellissa from Autism Adventures was kind enough to allow me to share the cards with you!  You can pick up the exclusive download HERE.
2 pictures, on the left is a behavior poster for body language, on the right is the cover of a behavior mini posters with the word freebie above
Are you ready to set up your own focus wall?  Well I have some great news!  I have pulled together all of my focus wall products into one big discounted bundle and you can find it HERE.  Not a fan of the blue and green that is in my classroom?  Not to worry! I recently updated the file to include 27 color options.  I hope that this makes it easier for you to create the focus wall of your dreams!
a collage of 27 color pallets, three types of editable pages, and an alphabet card bonus freebie  
Do you want an even closer look at the product? Check out the video preview!  Have a great school year!


Create Personalized Student Labels in Minutes!

Faded photo of blue and green bins labeled with students' names and clipart

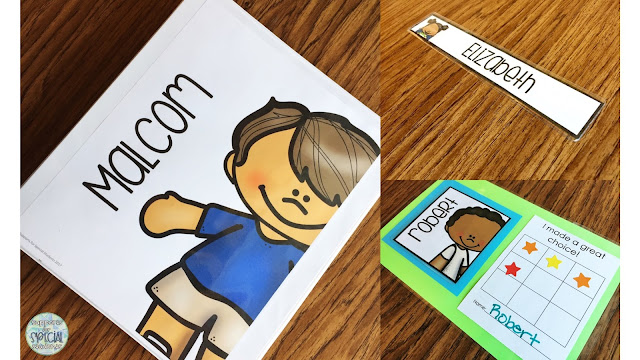
I love for my students to feel at home in our classroom.  Part of the way that I make that happen is by posting their names throughout the room.  I label their desks, binders, folders, cubbies, sticker charts and book bins.  I know what you are thinking... who has time to create personalized labels for EVERYTHING!?!  Well, it doesn't take as much time as you may think.

Square student labels with names and clipart next to sticker charts

I use The Ultimate Set of Student Labels to create personalized labels for all of my students.  And the best part? It only takes a few minutes!  Don't believe me?  Let me show you how I do it.
A description of how The Ultimate Set of Student Labels works.  Type names once and they auto populate onto the matching labels.
Type in your students' names once, and they autopopulate onto every label!  So simple! Just print, cut, and you're done!  I told you it was quick! 

Personalized student labels on a binder and sticker chart

There are 5 sizes of labels, each of which can be used in multiple ways.  I love to use the full sheets for my students' work binders and communication folders.  I use the half sheet size for their cubbies.  The long strip (which fits in the long adhesive pockets from the Target Dollar Spot) are perfect for name tags and binder spines.  I use the larger square for their sticker charts and the smaller rectangle for the front of their bins.  The larger squares fit perfectly in the 3 1/2 inch adhesive pockets from the Target Dollar Spot, or you can find this huge pack on Amazon (affiliate link).
4 photos of the student labels in various sizes.  8 inch fits inside cubbies, 3 1/2 inch fits in the square pockets from Target. 7 1/2 inch fits in the long target label, binder spines, and also words great as a name tag. 2 1/2 inch fits in the small pockets on most book bins (Target, Lakeshore & Michaels).
What about you?  Do you use personalized labels in your classroom? If not, I encourage you to give it a try! Your students will love it!  If you want to check out the pack that I use in my classroom you can find it HERE.  Have a great school year!